Remote Terminal System
User Guide
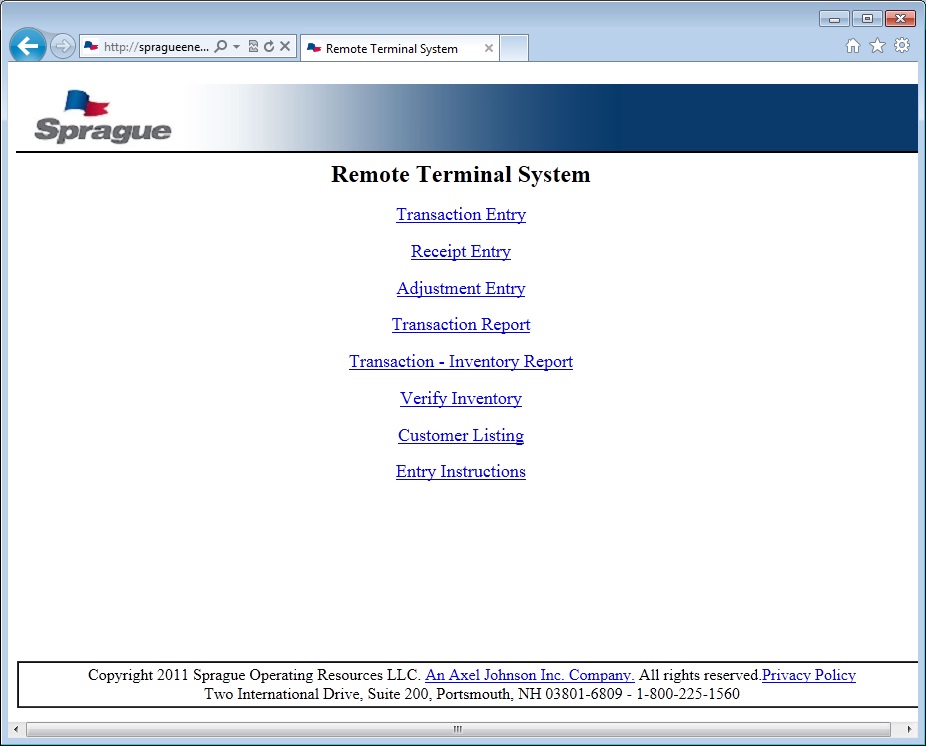
The application main screen includes 8 links. The Transaction Entry link opens the ticket entry screen in a new window. The Receipt Entry and Adjustment Entry links allow you to enter product receipts and adjustments for inventory tracking. The Transaction Report link allows you to run a report that lists all transactions for your terminal for a set date range. The Transaction - Inventory Report link allows you to run a report that lists all transactions, receipts, adjustments, and dailybeginning and ending inventory balances for your terminal for a set date range. The Customer Listing link lets you run a report that lists all of the customers set up in the system for your terminal. The Verify Inventory link opens a screen where you can verify and confirm end of day inventory levels for each product. Finally, the Transaction Entry Instructions brings you to the document that you are currently viewing, which describes how the system works.
Transaction Entry
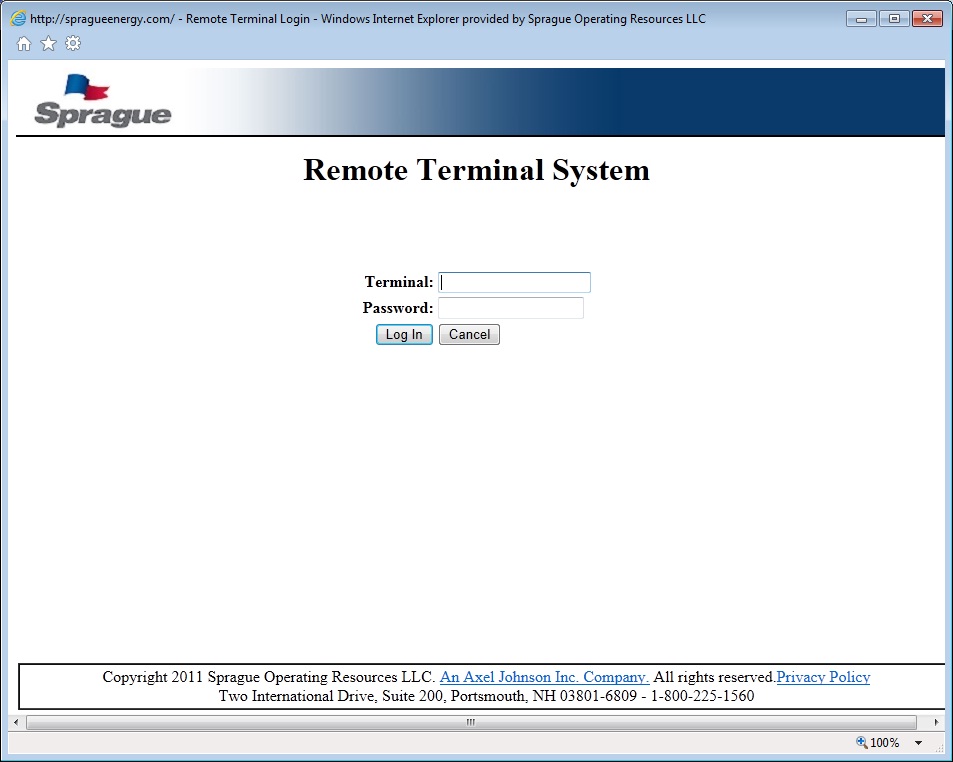
If you click the Transaction Entry link and have not previously logged in, you will be asked to log in using your Terminal ID and password. If it’s the first login on the new system, you will be required to update the password and then login again.
After logging in, depending on your terminal, you will see one of two screens.
If net gallons do not need to be recorded, the Transaction Entry screen will appear.
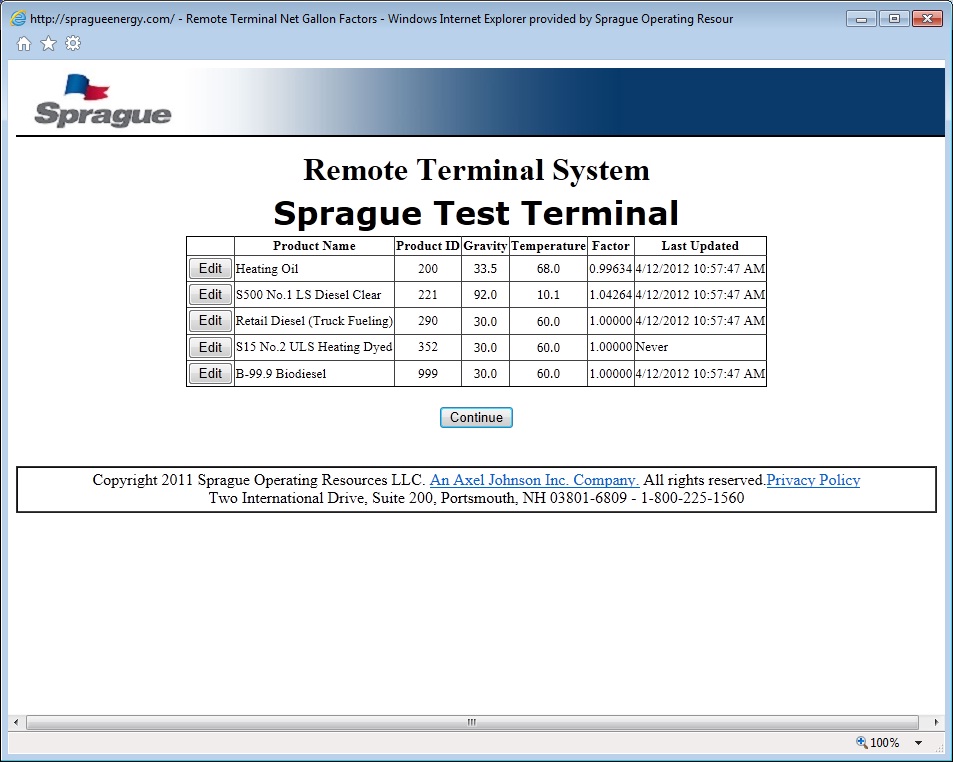
If net gallons are required, you will see a screen to enter the product gravity and temperature for each product in the system for your terminal. The first time you view this screen the default gravity and temperature will be zero. You are required to update all of the default values. On future visits you are not required to update the values, but they must be kept up to date since they are used to calculate net gallons on the lifting.
After updating or confirming the existing gravity(s) and temperature(s), press the OK button.
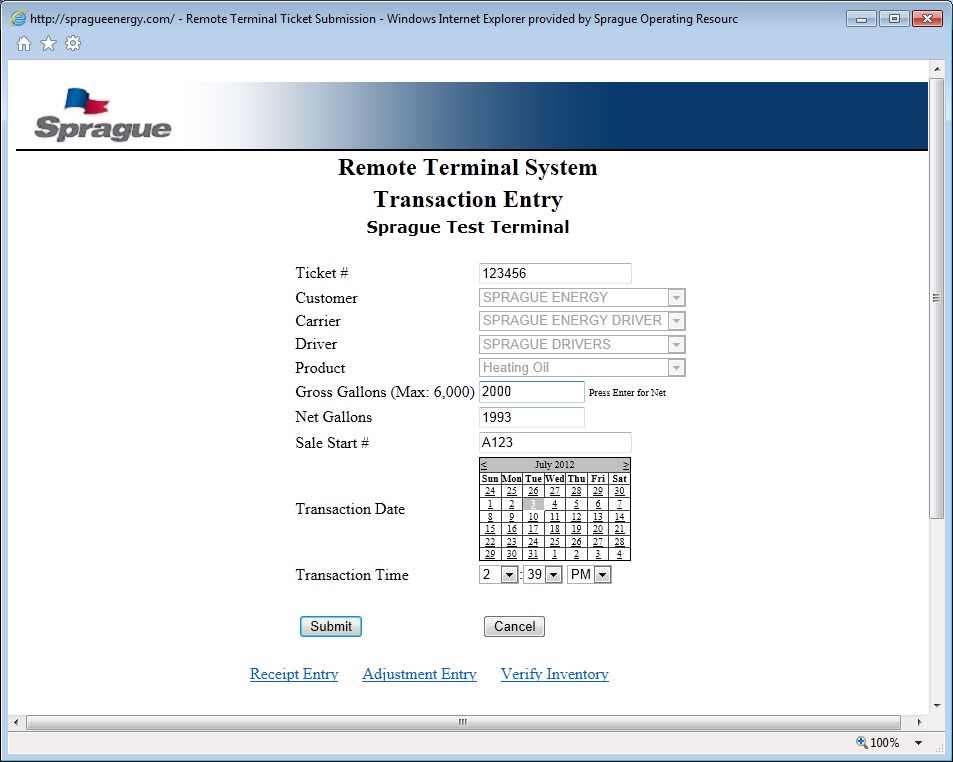
After setting the product(s) gravity and temperature, you will be directed to the Transaction Entry screen.
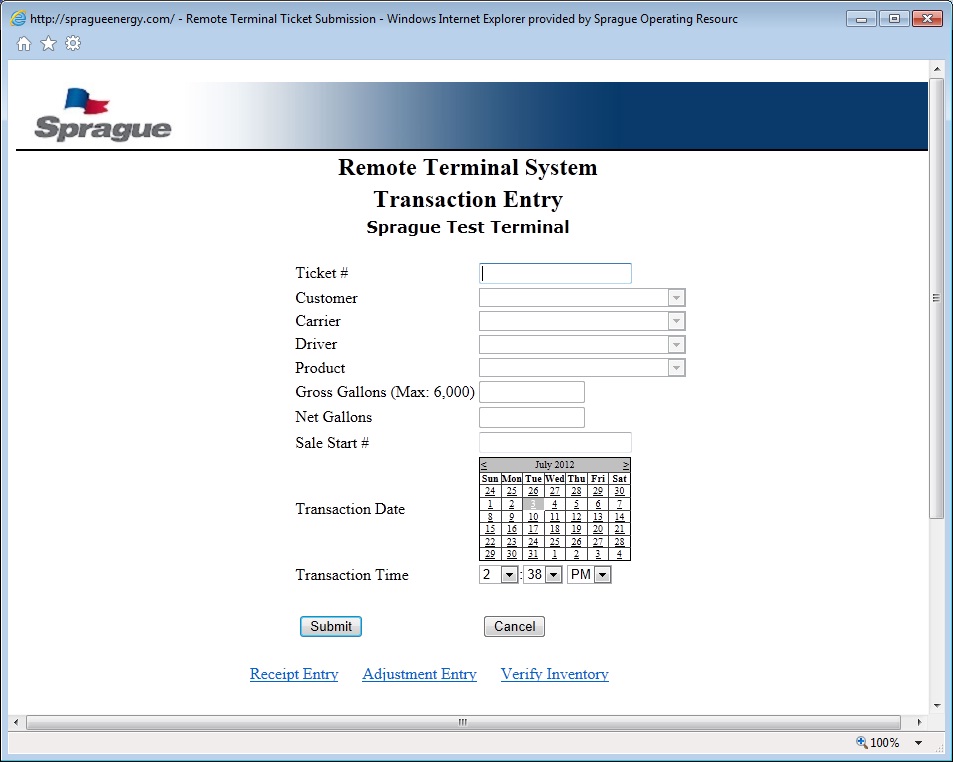
Ticket # - Enter the ticket number. The application checks to see if that ticket number has already been used.
o
If it has not, the focus is shifted to the Customer line.o If the Ticket has been used it retrieves the data associated with that transaction and displays it. (See Post Loading below)
Customer – If you click on the down-arrow to the right of the Customer entry box, you will be presented with a list of only those Customers that are cleared to load. This information is managed daily by Sprague’s Customer Care and they can dynamically change this data.
You can navigate down the list by typing the first letter of the Customer and then scrolling down the list as needed. Highlight the Customer.
Carrier – If there is only one Carrier associated with the chosen Customer that Carrier name will be displayed and the program will jump to the Driver Name field. If there is more than on Carrier you need to click on the down-arrow and choose the Carrier.
Driver Name – If there is only one Driver for this Carrier that driver’s name will be displayed and the program will jump to the Product field. If there is more than one Driver available you need to click on the down-arrow and choose the Driver.
Product – If this Terminal has more than one Product available, you need to click on the down-arrow and choose the product being loaded. If there is only one Product available that product name will be displayed and selected by default.
Gross Gallons – Enter the lifting gross gallons for the selected product.
Net Gallons – If net gallons do not need to be recorded, the net gallons will default to the gross gallons and can’t be updated. Otherwise, the net gallons are automatically populated based on the factor calculated from the gravity and temperature you previously entered for the selected product. You can overwrite the calculated gallons if necessary.
Transaction Date – Select the lifting date.
Transaction Time – Select the lifting time using the hour, minute, and AM/PM dropdown lists.
At this time you should click on the Submit button to enter this transaction information and the Driver can proceed to load. You will see a “Ticket successfully submitted” message at the top of the screen.
The Cancel button clears all selections.
Other issues:
Multiple products
If the terminal offers multiple products, an entry must be made for each product as each product will have a separate ticket. Entering a second product follows the same procedure as described above.
Post Loading
After the driver loads and returns, if you need to update the gallons or enter the Sale Start number, you must enter the ticket number you previously created. The program will recognize that this ticket number has already been entered and will retrieve the transaction information and display it. You can then update the gallons and Sale Start number and press the Submit button. You will see a “Ticket successfully submitted” message at the top of the screen.
The Cancel button cancels any change to the volume or Sale Start number and clears the selections.
The gallons and Sale Start number can be changed, if necessary, until the data is imported for billing.
Receipt Entry
If you click the Receipt Entry link and have not previously logged in, you will be asked to log in using your Terminal ID and password. If it’s the first login on the new system, you will be required to update the password and then login again.
After logging in, you will be directed to the Receipt Entry screen.
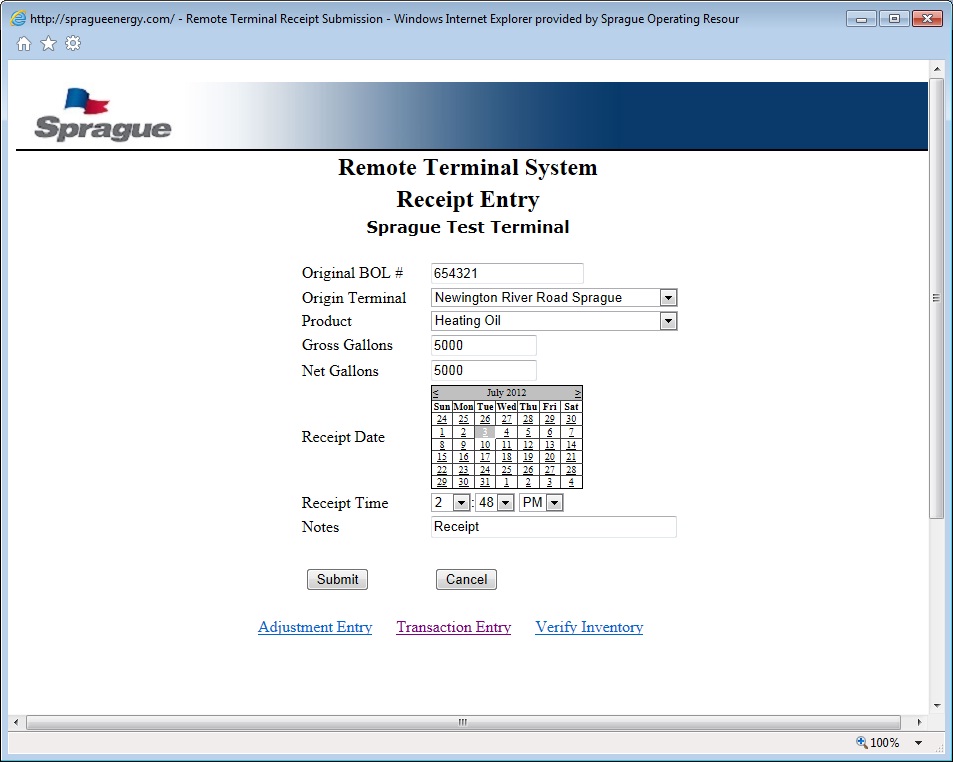
Original BOL # - Enter the original bill of lading number from the product pickup. The application checks to see if that BOL number has already been used.
o If it has not, the focus is shifted to the Customer line.
o If the BOL number has been used it retrieves the data associated with that receipt and displays it.
Origin Terminal
Product – If the terminal has more than one product available, you need to click on the down-arrow and choose the product being received. If there is only one product available that product name will be displayed and selected by default.
Gross Gallons – Enter the receipt gross gallons for the selected product.
Net Gallons – Enter the receipt net gallons for the selected product.
Transaction Date – Select the receipt date.
Transaction Time – Select the receipt time using the hour, minute, and AM/PM dropdown lists.
Notes - Enter any notes or comments pertaining to the receipt.
At this time you should click on the Submit button to enter this receipt information. You will see a “Receipt successfully submitted” message at the top of the screen.
The Cancel button clears all selections.
Adjustment Entry
If you click the Adjustment Entry link and have not previously logged in, you will be asked to log in using your Terminal ID and password. If it’s the first login on the new system, you will be required to update the password and then login again.
After logging in, depending on your terminal, you will see one of two screens.
If net gallons do not need to be recorded, the Adjustment Entry screen will appear.
If net gallons are required, you will see a screen to enter the product gravity and temperature for each product in the system for your terminal. The first time you view this screen the default gravity and temperature will be zero. You are required to update all of the default values. On future visits you are not required to update the values, but they must be kept up to date since they are used to calculate net gallons on the lifting.
After updating or confirming the existing gravity(s) and temperature(s), press the OK button.
After setting the product(s) gravity and temperature, you will be directed to the Adjustment Entry screen.
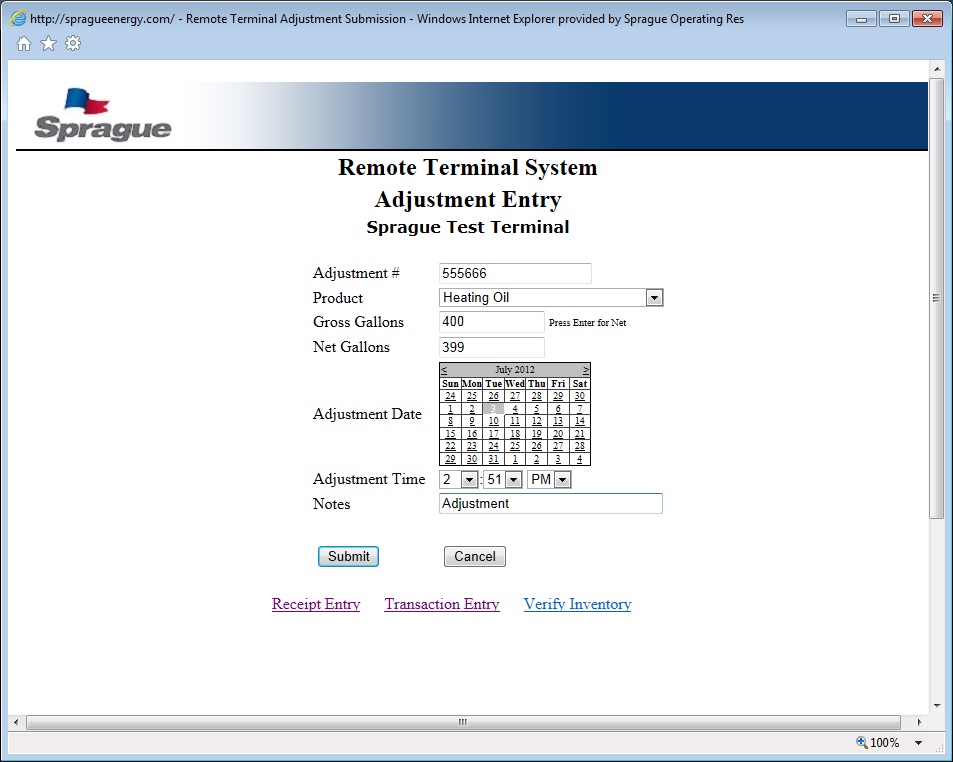
Adjustment # - Enter a unique number to identify the adjustment. The application checks to see if that adjustment number has already been used.
o If it has not, the focus is shifted to the Product line.
o If the BOL number has been used it retrieves the data associated with that adjustment and displays it.
Product – If the terminal has more than one product available, you need to click on the down-arrow and choose the product inventory being adjusted. If there is only one product available that product name will be displayed and selected by default.
Gross Gallons – Enter the adjustment gross gallons for the selected product.
Net Gallons – If net gallons do not need to be recorded, the net gallons will default to the gross gallons and can’t be updated. Otherwise, the net gallons are automatically populated based on the factor calculated from the gravity and temperature you previously entered for the selected product. You can overwrite the calculated gallons if necessary.
Transaction Date – Select the adjustment date.
Transaction Time – Select the adjustment time using the hour, minute, and AM/PM dropdown lists.
Notes - Enter any notes or comments pertaining to the adjustment.
At this time you should click on the Submit button to enter this adjustment information. You will see a “Adjustment successfully submitted” message at the top of the screen.
The Cancel button clears all selections.
Inventory Confirmation
If you click the Verify Inventory link and have not previously logged in, you will be asked to log in using your Terminal ID and password. If it’s the first login on the new system, you will be required to update the password and then login again.
The first time you access the Verify Inventory page you will get a screen asking for the current day's starting inventory levels for each product. If new products are added, you'll be prompted for the starting inventory for each new product.
Gross Gallons – Enter the current day starting inventory gross gallons for each product.
Net Gallons – If net gallons do not need to be recorded, the net gallons will default to the gross gallons and can’t be updated. Otherwise, the net gallons are automatically populated based on the factor calculated from the gravity and temperature you previously entered for the selected product. You can overwrite the calculated gallons if necessary.
Click the OK button to proceed to the Inventory Confirmation screen.
The Cancel button clears the gallon values.

If it's not the first time you access the inventory screens, and there are no new products, the Verify Inventory screen will appear.
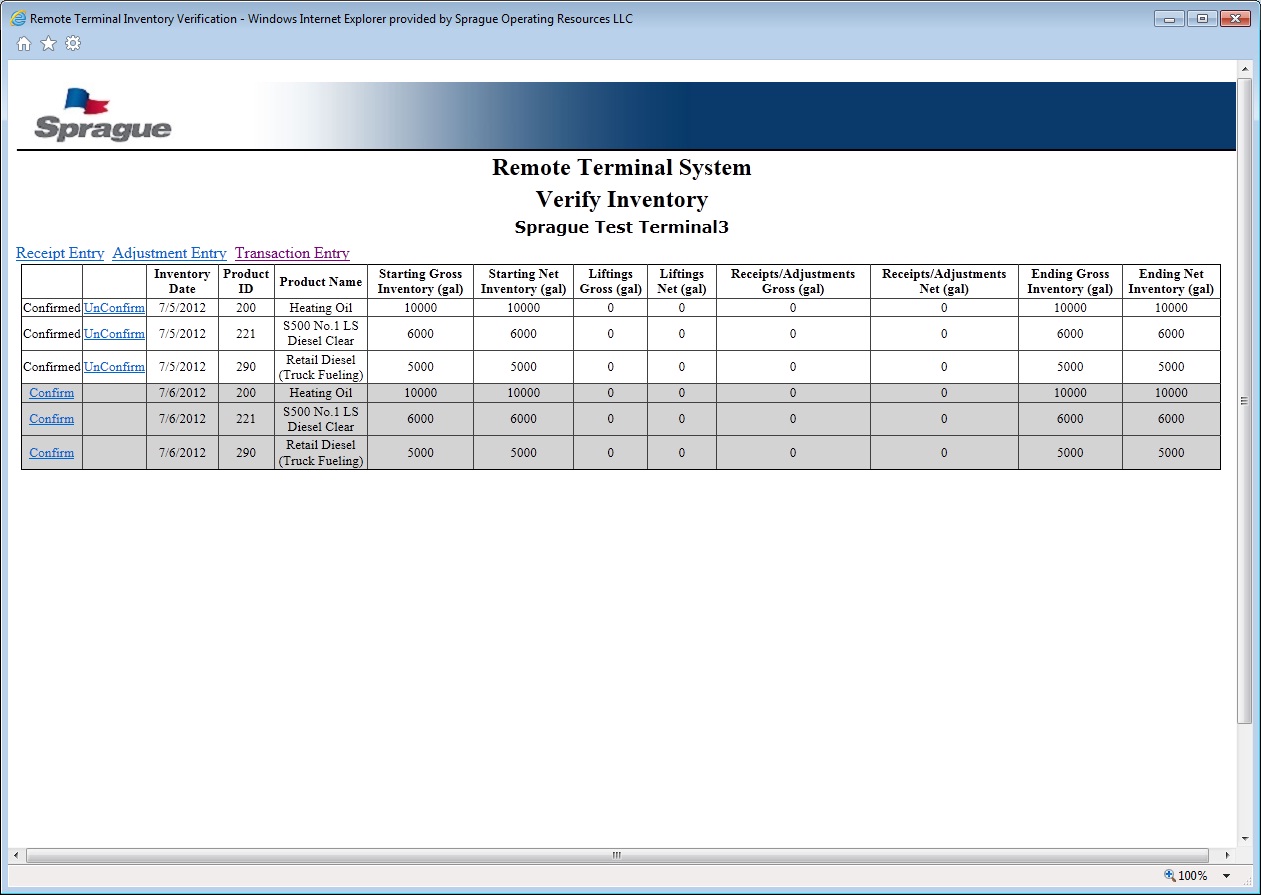
After verifying that the liftings, receipts / adjustments, and end of day inventory volumes are correct for a product, press the Confirm button in the first column. If a lifting or receipt is missing, or an adjustment is required, you can use the links at the top of the table to open the pages required to add them. You are only allowed to confirm the daily inventory for a product if all previous day's inventories for the product have been confirmed.
If you need to add a ticket, receipt, or adjustment for a product on a date for which the end of day inventory has already been confirmed, you must first press the Unconfirm button for that product and date. All end of day inventories for that product from the selected date forward will be unconfirmed. After entering the missing items you will need to reconfirm the end of day inventories. The system does not allow tickets, receipts, or adjustments to be entered for a product on a day that the end of day inventory has already been confirmed.
The Sprague Inventory department is notified via email when an end of day inventory is confirmed or unconfirmed.